


Star Trek Borg might be essentially the most uncommon starship not solely within the Star Trek universe however amongst a whole bunch of different spaceship 3D fashions you could find on Gambody. Firstly, Borg Dice is a dice. Secondly, it’s rather more than only a dice as a result of it boasts an intricate exterior design and iconic structure, despite the fact that it lacks the normal ship compartments.
Let’s take a better have a look at the Borg Dice mannequin 3D printed by Brian Spradlin, who shared the images of his creation and recommendations on constructing his Borg ship with Gambody group. This fanatic was additionally type sufficient to share his suggestions and recommendation on finishing his astonishing Star Trek 3D print that includes LED wiring with our weblog readers.
Borg Dice
First showing in Star Trek TNG (The Subsequent Era), the Borg have symbolized the juggernaut in opposition to which “resistance is futile,” and the spectacular Borg Dice mannequin has turn out to be a preferred spacecraft 3D mannequin to make for private assortment.
The cube-shaped Borg ship is a formidable 3D printing vessel with an unimaginable degree of element and excellent high quality. You’ll be able to obtain Borg Dice STL recordsdata and recreate this static meeting venture, following the concepts utilized by Spradlin.
Interview with Star Trek Borg Ship Maker
1. Howdy, Brian! Thanks for sharing photographs of your unimaginable Star Trek Borg 3D print with Gambody group. It appears improbable! When did you first find out about 3D printing?
I’ve been 3D printing since someplace round 2014. I began out with one of many Printrbot Easy wood 3D printers. Over the previous 11 years I upgraded to Printrbot’s all-metal model, then to a Prusa MK2, which I upgraded a number of instances. Now, I’ve moved on to the Prusa XL with 5 print heads so I can produce multi-color prints. I’ve at all times loved having the ability to create bodily variations of issues that weren’t stocked in shops.
Learn additionally: Greatest Low cost 3D Printer for a Newbie.
2. What are your favourite Star Trek 3D fashions moreover the Borg ship?
I don’t actually follow anybody sci-fi style. Star Trek is considered one of my favorites, however many of the essential starships from the exhibits may very well be present in shops or mannequin kits over time. What I’d by no means been capable of finding was a very good, detailed model of the Borg Dice. I at all times wished one thing that highlighted all of the pipes and conduits that made up the ship. There have been just a few digital fashions I discovered on-line that appeared okay, however they weren’t suited to 3D printing. I attempted to print just a few and simply ended up pissed off.

Borg Dice measurement: How huge is a Borg Dice? Within the Star Trek TNG, an abnormal Borg spaceship aspect was about 9,842 ft (3 kilometers), with the ship boasting a complete quantity of 27 cubic kilometers. Gambody’s 3D mannequin of a spaceship is way smaller. Its FFF/FDM model is 21.69 inch (551 mm) tall, 21.69 inch (551 mm) huge, and 22 inch (559 mm) deep if printed at 100%.
3. You printed Borg Dice at 60% scale. Why did you select this specific scale on your venture?
I’d like to see the Borg Dice mannequin at full scale sometime; there simply wasn’t any great way I may show it at my home at that measurement. I knew firstly that I had a restricted quantity of area obtainable in my workplace to show Star Trek Borg as soon as it was executed. I’ve collectible gadgets on cabinets throughout me, however couldn’t justify taking on the area {that a} 100% scale would use. I did some fast measuring and located that the highest of my bookshelves can be an ideal spot if I went with a 60% scale, with area for the included stand and a spot between it and the ceiling. It additionally retained all the main points I wished from the 3D mannequin of a spaceship with my 0.4mm nozzle-size FDM printer.

4. You talked about that you simply printed Star Trek Borg with black and grey PLA. Which 3D printer did you utilize?
On the time of the venture, I had simply upgraded to a Prusa XL, so all the elements have been printed on that machine. I had the choice to print with twin colours since I began with the 2-head mannequin, however, truthfully, I felt that the layers within the mannequin itself labored greatest in several colours with just a few paint highlights later. I checked out as many images of the Borg Dice from the unique Star Trek TNG TV exhibits as I may discover to work out what shade I wished to make use of. In some circumstances, it appeared principally black, in others, it appeared nearly solely grey. Ultimately, I made a decision to layer the colours and go together with one thing distinctive for my private assortment.

Borg materials: Within the Star Trek universe, the Borg Dice ship has a double-layered tritanium hull. It’s a tremendous sturdy and sturdy alloy. Borg spaceship can be bolstered with ablative armor. Nevertheless, in relation to reworking the spaceship STL recordsdata right into a bodily kind, most hobbyists select a special Borg materials, principally PLA or resin.
5. Do you keep in mind how lengthy it took you to complete 3D printing all 128 elements of this 3D mannequin of a spaceship from Star Trek?
I don’t recall the precise variety of days. I began printing the primary squares round mid-January, and my remaining images of the construct are from February 2nd. So, it was someplace simply over two weeks of printing and meeting. My printer wasn’t working continually, however I keep in mind printing two or three batches of Borg Dice elements on most days. Then, there was the portray and meeting work. I additionally spent a little bit of time designing the LED harness for the inside lights, which was after the principle physique prints had been accomplished.
Learn additionally: Improbable USS Defiant Star Trek 3D Print (Suggestions & Tips by Anthony Sforza).
6. How a lot PLA did your Star Trek Borg require?
I used nearly 4 customary spools of black and one spool of grey PLA filament by the point I used to be executed. A few of that was used with re-prints the place I had some mattress adhesion points and the thinner items curled up. The ultimate printed items of Borg Dice have been most likely nearer to 3 spools of black materials.
7. How did you get the concept to make use of acrylic paint markers so as to add golden and silver highlights to PLA? Is that this course of time-consuming?
I had one other venture from the earlier 12 months the place I used to be attempting so as to add chrome particulars to a 3D print and located some recommendation on-line about good paint pens that might give me near the look I wished. I did a bit extra analysis after I began printing the Borg Dice from Star Trek TNG and landed on a model of acrylic paint pen, Artistro, that had each gold and silver that appeared fairly good after I examined them on the black PLA I used to be utilizing. Since they’re paint pens, it didn’t require as a lot setup or cleanup time to make use of, so the highlighting went fairly rapidly. I caught to small areas within the Borg Dice mannequin that appeared like vents or sheets of paneling that I’d be capable of see by the layers as soon as they have been assembled. It’s undoubtedly one thing I’ll do once more with future fashions!


8. The place did you find out about making use of black scorching glue to connect layers of PLA? Would you advocate this methodology to different hobbyists?
I appreciated that the Borg Dice mannequin included the pegs that match into every panel so there weren’t any gaps after meeting. However I knew that if I used my regular technique of tremendous gluing them collectively, I’d get an excessive amount of of the everyday white “haze” in every spot, particularly with the black PLA. I thought of utilizing black two-part epoxy that I’ve had good success with prior to now, however that required rather more time to set than I wished to take. It additionally allowed the items to shift after gluing except I weighed them down whereas they dried. I additionally thought of utilizing a soldering tip to simply re-melt the PLA collectively at every connection. In that case I didn’t really feel I had sufficient management or would go away sufficient plastic to fuse it correctly. Lastly, I did some testing with black scorching glue, which I’d used just a few years earlier for an additional venture, and it labored nice for The Borg ship. It was fast to set and gave me a robust bond between every layer, which was excellent for my construct! If others wish to do the identical, I might simply point out that the glue will look shiny, whereas the PLA typically is extra matte. Different individuals would possibly wish to paint the glue with a matte black later, particularly if the 100% scale exhibits the spots extra clearly.

9. How did you uncover your methodology of blocking the interior mild from the seams utilizing strips of duct tape and packing foam? Are you able to clarify it in additional element, please?
I began the venture with a plan to make use of the black scorching glue to fill the areas between every assembled piece of Borg ship to forestall mild bleeding by the small gaps. However after assembling the underside face of the Borg Dice I spotted it was troublesome to get to precisely the locations I wanted. I considered utilizing black electrical tape, however the adhesive on that isn’t as sturdy as I wished. I’ve used aluminum duct tape for mild blocking on different initiatives and realized it could be very easy to chop strips that might seal my dice faces and would keep in place. The adhesive on aluminum duct tape is supposed to deal with excessive warmth, so it stays the place you set it!

After that, I knew I wished one thing to diffuse the sunshine popping out from the middle of the Borg Dice for the holes constructed into the mannequin. I didn’t wish to simply depart the present holes empty since you’d see the only factors of LED mild as you moved across the spaceship when it was on. I’ve performed round with methods to diffuse LEDs in different initiatives and did some fast checks to see what would work with the way in which the Star Trek TNG Dice was configured. Regular printer paper did an okay job, however blocked extra of the sunshine than I wished. Wrapping the LEDs within the middle with fiber stuffing, like you’ve gotten in stuffed animals, additionally labored okay, however didn’t give a fair distribution of sunshine out to the corners. I attempted some tissue paper, which was fairly shut, however not fairly the correct look I used to be after. I lastly settled on the skinny packing foam after seeing the way it stored the sunshine evenly distributed throughout the floor of Borg Dice mannequin and let extra mild by than the opposite supplies I’d tried.

Learn additionally: The right way to Put Up LED Lights in a 3D Printed Mannequin.
10. How can hobbyists use tissue or printer paper to realize an analogous light-blocking impact?
Each printer and tissue paper are good substitutes in case you simply need the inexperienced shade, however aren’t frightened about it being fairly as brilliant throughout the day. It diffuses the sunshine to the perimeters properly, and the thinner the tissue paper, the extra mild you get by. It’s actually private choice for anybody who needs to work with it.

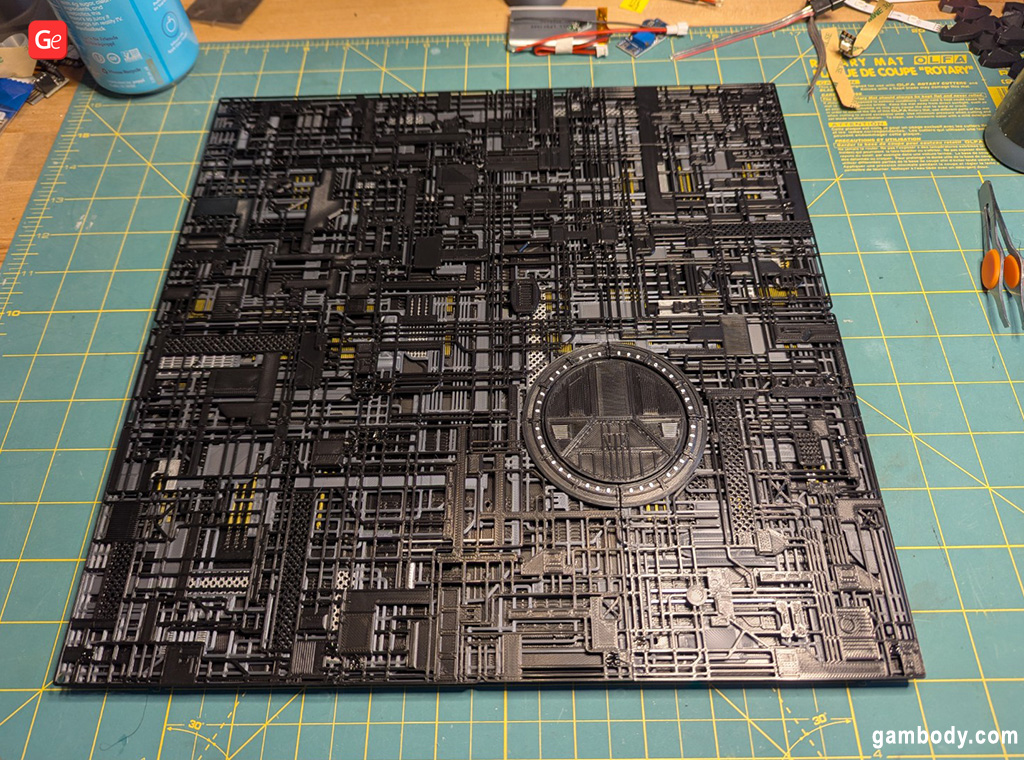
11. To make clear, did you utilize no post-processing or common portray and depart PLA the way in which it was after printing, simply including the highlights with markers? Or was there extra work to do earlier than you began assembling the Borg Dice layers?
There was little or no post-processing that I needed to do with any of the elements of Star Trek Borg Dice. A number of the exterior layer items wanted assist utilized in just a few small locations, however not many. Eradicating these helps was all I did earlier than including the highlights with the paint pens. I thought of including a layer of enamel or acrylic spray sealer over high of my painted items, however determined in opposition to it in the long run. The painted elements are all on the 2 inside layers, with the ultimate layer being simply black PLA. That retains the paint from being touched when the Borg Dice is dealt with, so it’s been fantastic.
12. You talked about designing and printing an inside Borg Dice scaffold to carry your multi-color LEDs. What software program did you utilize? Can different lovers obtain and use your design to complete their Star Trek Borg?
I used Fusion 360 to design the scaffolding that I used for my inside lighting. Because it was designed to suit the 60% scaled Borg ship mannequin and the fairy mild RBG LEDs I used, it doesn’t fairly scale to work with the Borg Dice 3D mannequin at 100%. For the full-scale mannequin, it won’t present sufficient mild with the variety of LEDs I used. Scaling the scaffolding up would make the gap between every LED holder too lengthy for the fairy lights I used.

But when anybody is enthusiastic about utilizing it at that scale, or modifying it to totally different scales, they will go to Printables.

13. You used 4 LEDs per Borg Dice aspect (fairy mild RGB lights). How did you choose this quantity per aspect?
I did some fast checks with the LEDs earlier than I constructed the inside holder, simply turning on just a few of the LEDs and seeing how a lot mild I may see from the skin of the Borg Dice. I additionally wished a quantity that I may run from a LIPO battery for just a few hours, so I went with the minimal that I felt nonetheless lit up the area I wanted.
14. Did you carry out any checks together with your Arduino controller working WLED earlier than ending the Star Trek TNG venture?
I’ve used the WLED software program on two different initiatives earlier than Borg Dice mannequin. In most of my different initiatives it’s been used for multi-color animations. On this case, the first mode I exploit is a stable inexperienced, so it was undoubtedly extra highly effective than I wanted only for that. I may have simply used strings of inexperienced LEDs and a standard Arduino to schedule instances to show it on or off. However I’ve additionally used the WLED program so as to add some flashing animations to the Star Trek Borg Dice, making it look extra like a battle-damaged or low-powered craft. There’s numerous out-of-the-box choices with that program, which makes it nice for 3D mannequin lighting.

15. The place do you show your Star Trek Borg?
I’ve the Borg Dice on the highest of my bookshelf in my workplace, simply behind the place I sit for work every day. It’s linked to a USB energy provide, so the WLED program can flip it on at sundown each night. I typically discover the inexperienced glow close to the ceiling within the evenings after I stroll previous my workplace door.

16. What’s your subsequent 3D printing mannequin?
I’m not sure what I’ll 3D print subsequent. I’ve actually loved printing different fashions from Gambody 3D printing market, and have the Iron Large, Ratchet from Ratchet & Clank online game, and a model of the Dalek sitting on my cabinets already. I’ve the Crimson Dwarf ship on my listing to print sooner or later, however I’ve run out of room for it in the meanwhile!

The Gambody workforce would like to thank Brian Spradlin for taking the time to reply our questions, share his expertise on lighting up his 3D printed Borg Dice, and allow us to have a look at all of the spectacular images of the method. If you’re an enormous fan of Star Trek TNG and the superb universe that this TV collection laid the begin to, you’ll be able to uncover many nice Star Trek 3D fashions on Gambody 3D printing market and breathe life into your favourite spaceships.
Be happy to share images and movies in addition to recommendations on finishing your initiatives with different lovers in Gambody 3D Printing Group on Fb. Perhaps you additionally wish to mild up your improbable Borg Dice following Spradlin’s recommendation. Make it so!
(Visited 48 instances, 1 visits as we speak)
