


The final time I posted a Tiny Whoop DIY construct information was eight years in the past! Since then, the FPV world has seen spectacular developments, and now you don’t essentially must construct your personal Tiny Whoop. Bind and Fly (BNF) fashions carry out brilliantly out of the field and are sometimes cheaper than constructing your personal. Nevertheless, constructing a Tiny Whoop from scratch remains to be a unbelievable technique to study the fundamentals of FPV drones, perceive how every element connects, and it may be a enjoyable venture. On this tutorial, I’ll information you thru an inexpensive, extraordinarily excessive efficiency Tiny Whoop construct. We’ll go over the important parts, meeting course of, and a few helpful tricks to make your first construct successful.

Why Construct a Tiny Whoop?
Should you’re all in favour of studying how you can construct a Tiny Whoop and dive into the world of FPV drones, Tiny Whoops are a wonderful start line. Constructing a light-weight Tiny Whoop is enjoyable, rewarding, and lots much less intimidating for rookies—particularly if you happen to’re new to FPV drone flying.
These micro drones are inexpensive, compact, and light-weight, making them a lot safer to fly than bigger drones like a 5-inch quad. Since they’re designed to resist crashes with out inflicting injury, they’re perfect for brand spanking new pilots who wish to follow flying with out concern.
This construct minimizes soldering, conserving it easy for rookies. For this Tiny Whoop, you’ll solely must solder the motors to the flight controller—simply three pads per motor. The remaining is plug-and-play, making it an ideal venture if you happen to’re new to soldering or wish to maintain issues easy.
Components
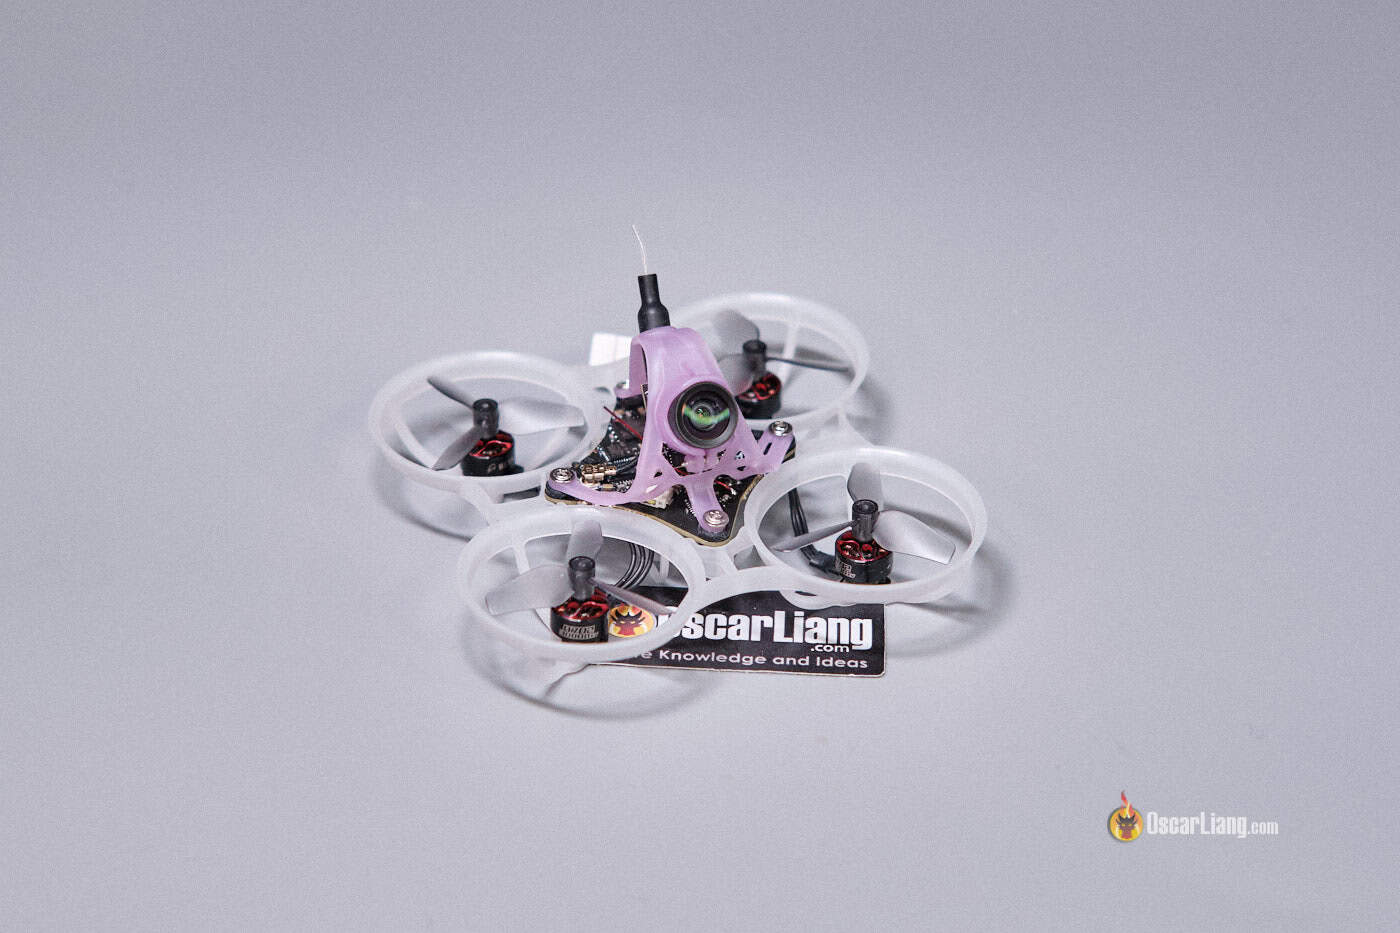
The aim for this Tiny Whoop construct is to maintain the overall weight beneath 17 grams, leading to a strong and nimble micro drone. Attaining that is no straightforward feat—the lightest Tiny Whoop in the marketplace is simply over 17g, so staying beneath this weight requires cautious planning and exact execution.
For comparability, the Mobula6 2024 (proper) weighs 17.7g, the Air65 (center) weighs 17.2g, and my customized construct (left) solely weighs 16.8g.

The parts chosen are cutting-edge, providing efficiency that you just received’t discover in an off-the-shelf whoop. Right here’s what you’ll must construct a Tiny Whoop for round $130:
- FC / VTX / RX / 4in1 ESC: BetaFPV Air 5-in-1 AIO FC ($50)
- Motors: 4x BetaFPV 0702 30000KV ($49)
- FPV digicam: BetaFPV CO3 digicam ($20)
- Body: NewBeeDrone Cockroach LiteAF ($5)
- Cover: BetaFPV Micro Air Cover ($3)
- Propellers: HQ Ultralight Triblade ($2.5)

Constructing your personal tiny whoop might be costlier than a pre-built mannequin, and also you’ll must assemble it your self. Should you’re on the lookout for a ready-to-fly expertise, the BNF mannequin is a good selection, listed below are my suggestions: https://oscarliang.com/best-tiny-whoop/#Greatest-65mm-Tiny-Whoops. However if you happen to’re after the satisfaction of constructing your personal micro drone with top-notch efficiency, this information is ideal for you.
BetaFPV Air 5in1 AIO Board
The star of this construct is the BetaFPV Air 5in1 AIO board, which is an absolute game-changer. Weighing solely 4.9g, this board integrates the flight controller, ESC, OSD, VTX, and ExpressLRS receiver into one light-weight unit. This setup not solely simplifies the construct but additionally reduces weight considerably. A 4in1 model with out a receiver can also be out there, however I like to recommend the 5in1 model until you propose to make use of a special receiver just like the TBS Crossfire Nano.
Get it right here:

BetaFPV 0702 30000KV
For this construct, I selected BetaFPV’s newest 0702 30,000KV motors. These high-KV motors shine in ultra-light builds, providing unimaginable responsiveness and velocity. Decrease-KV variations, like 27000KV or 23000KV, can supply higher flight time, however in ultra-light builds, they have a tendency to really feel much less highly effective – this was significantly noticeable after I was testing them again to again. The upper-KV motors additionally supply extra flexibility, as you’ll be able to alter motor output or scale down throttle in Betaflight if you happen to favor a slower, extra managed flight expertise. I’ve a tutorial explaining how you can scale down throttle right here: https://oscarliang.com/reduce-power-throttle-taranis-betaflight/.
Get it right here:

NewBeeDrone Cockroach LiteAF Body
The NewBeeDrone LiteAF body, weighing solely 2.4g, is presently the lightest body in the marketplace.
Get it right here:

The BetaFPV Meteor65 Air body is a good various, used within the Air65 mannequin, and weighs barely extra at 2.8g with barely larger sturdiness. Get it from BetaFPV: https://oscarliang.com/product-d2cs

BetaFPV Air Cover
I selected the BetaFPV Air Cover for its compatibility with the digicam we’re going to use. It’s easy, efficient, and light-weight, matching properly with the remainder of the parts on this construct.
Get it right here:

BetaFPV CO3
For video, I opted for the BetaFPV CO3 analog digicam, which supplies an amazing steadiness between picture element and subject of view. It comes with a connector, which you’ll plug straight into the BetaFPV AIO board with none soldering, making meeting easy.
Get it right here:

HQ Ultralight Triblade
These HQ Ultralight Triblade props are perfect for high-KV 0702 motors (just like the 30000KV we’re utilizing) because of their light-weight design (about 0.5g per 4 props). They require much less torque to spin, offering an amazing steadiness between efficiency and sturdiness. One other common possibility is the Gemfan 1219S (about 0.8g per 4 props), which is barely extra sturdy however a bit heavier. Each are glorious decisions for a 65mm Tiny Whoop construct.
Get it right here:

Different Elements
To fly this Tiny Whoop, you’ll want a couple of extra elements and items of kit.

Listed below are my suggestions:
For extra Tiny Whoop-related equipment, take a look at this submit: https://oscarliang.com/best-tiny-whoop/
The Construct Course of
Getting ready the FC
Solder the BT2.0 battery result in the facility pads on the flight controller (FC), paying cautious consideration to polarity—the blue wire is + (constructive), and the white wire is – (damaging).

Getting ready the Motors
In case your motors include connectors, you’ll want to chop them off, leaving about 28-29mm of wire from the motor base. Dry-fit the motor and FC to double-check the mandatory wire size.
Be conscious to not minimize off an excessive amount of wire, as this might put extra stress on the solder joints in a while. Ideally, depart a little bit of slack. If there’s an excessive amount of slack, you’ll be able to twist the wires to forestall them from dangling or interfering with the spinning propellers.

Some whoop FC comes with motor connectors, you’ll be able to simply plug the motors in with out soldering. Nevertheless these add weight and introduce extra electrical resistance than direct soldering. For max efficiency, direct soldering is most well-liked.
Strip a little bit of insulation from the ends of the wires and tin them with recent solder.

Soldering the Motors
Tin the motor pads on the flight controller and apply a small quantity of solder flux to those pads, able to be soldered.
Solder the motor wires to the motor pads on the board. These pads are small, so a gentle hand and endurance are wanted, particularly if you happen to’re new to soldering. Work shortly to keep away from overheating the pads, as this might trigger them to carry and completely broken.

The precise order of the wires doesn’t matter, as you’ll be able to alter motor rotation path later in software program.
New to soldering? Take a look at this primary information: https://oscarliang.com/soldering-guide/
Mounting the FC
Insert the rubber grommets within the 4 nook holes of the FC.
Drop the FC into the body, making certain the right orientation—often indicated by an arrow pointing ahead, with the battery connection on the again.


Mounting the Motors
Set up the motors on the body with the supplied screws. They arrive with two varieties, steel and plastic screws. I selected to make use of the plastic ones as they’re lighter. Nevertheless they’re a bit bit too lengthy, you can trim them to about 1.5mm thread size utilizing a nail clipper.

If the motor wires have slack, twist them barely earlier than set up to maintain them tidy and keep away from stress on the solder joints.

Putting in the Digital camera and Antenna
Set up the FPV digicam and VTX antenna within the cover.

Plug the digicam into the FC.

Putting in the Cover
I seen that the cover interfered with the UFL antenna connector, and this has been a identified challenge within the Air65 as some customers report that crashes may cause the connector to pop off.

To keep away from this, trim the cover barely to permit area for the connector. Contemplate including a dab of E6000 glue too to the UFL connector to assist safe it throughout crashes.
I made a mistake right here – the digicam is the wrong way up LOL. Simply loosen the digicam mount screw, and rotate the digicam 180 levels.


Mounting the Propellers
Put the props on, relying on whether or not you wish to run “props in” or “props out”. In my instance I’m operating “props out”.
And that’s it—your Tiny Whoop meeting is full!
Reducing Digital camera Title Angle
One challenge with the Air Cover is the excessive digicam angle. To deal with that, chances are you’ll copy my workaround. I used a 2mm zip tie.

Betaflight Configuration
As soon as your Tiny Whoop is assembled, it’s time to configure it in Betaflight. New to Betaflight? Take a look at my newbie’s information: https://oscarliang.com/betaflight-firmware-setup/
Join the USB adapter to the flight controller (FC) and plug the USB cable into your laptop.
Listed below are some tips about optimzing your tiny whoop configurations: https://oscarliang.com/best-tinywhoop-settings/
Under are screenshots of my Betaflight Configurator settings for this construct. Should you’re utilizing the identical setup, you’ll be able to simply replicate my configuration by copying and pasting my CLI file right here.


ESC Configuration
The BetaFPV AIO FC comes preloaded with Bluejay 0.19 firmware at 96KHz. I like to recommend flashing the most recent model—Bluejay 0.21 at 48KHz—for optimized efficiency. You may learn to flash Bluejay firmware right here: https://oscarliang.com/bluejay-blheli-s/

Flight Efficiency
I efficiently achieved my goal of a sub-17g construct, and the primary flight exceeded my expectations.
With a 1S 300mAh battery, I achieved a flight time of round 3:quarter-hour when flying aggressively—about 10-15 seconds lower than with the 27000KV motors. Nevertheless, the increase in flight efficiency is properly value it, for my part. It’s just like shifting up from 23000KV to 27000KV; the construct felt considerably extra highly effective, agile, and nimble, virtually like flying a whoop with a lot much less weight.
Closing Ideas
That is how one can construct a Tiny Whoop with distinctive flight efficiency for simply $130.
This construct affords one of many best methods to start out assembling FPV drones from scratch and achieve a stable understanding of them. It’s inexpensive, secure, and supplies a hands-on introduction to assembling, configuring, and flying an FPV drone. You’ll additionally develop primary soldering expertise with minimal threat, as solely the motors require soldering.
Whether or not you’re practising indoors or flying in tight areas, this Tinywhoop affords a enjoyable and academic expertise that may construct your confidence earlier than shifting on to bigger drones.
